

Docker has become an essential tool in modern software development, with 42% of professionals incorporating it into their tech stack. Its growing adoption is driven by its ability to simplify workflows, allowing developers to package applications along with their dependencies into lightweight, portable containers.
In this guide, we'll walk through how to install Docker on Ubuntu 24.04, covering different installation methods, verification steps, and essential setup commands for a successful installation.
What is Docker?
Docker is a platform that allows you to package, distribute, and run applications in lightweight, portable containers. Unlike virtual machines, which require a full operating system for each instance, Docker containers share the host system’s kernel, making them faster and more efficient.
With Docker, your application runs consistently across different environments, whether on your local machine, a testing server, or in production. This consistency is why Docker is widely used in DevOps, cloud deployments, and CI/CD workflows.
Prerequisites
Before getting started, make sure you have the following in place:
- A system running Ubuntu 24.04. This how-to tutorial was created and tested using Bacloud OpenVZ and KVM VPS services.
- A user account with sudo privileges to run administrative commands
- An active internet connection to download required packages
Once these are set up, you’re ready to install Docker.
Step 1: Update Your System
Before installing Docker, it's important to update your system to ensure compatibility with the latest software packages. This prevents conflicts and keeps your system secure.
Run the following command to update your package index and upgrade existing packages:
|
sudo apt update && sudo apt upgrade -y |
Next, install essential dependencies for secure package downloads and SSL certificate verification:
|
sudo apt install -y curl ca-certificates |
- curl – Used to download files from external sources.
- ca-certificates – Verifies SSL certificates for secure connections.
With your system updated and dependencies installed, you're ready to install Docker.
Step 2: Install Docker on Ubuntu
There are two primary ways to install Docker:
- From Ubuntu’s Default Repository – A quick setup, but the version may be outdated.
- From Docker’s Official Repository – Ensures access to the latest version with security updates.
Option 1: Install Docker from Ubuntu’s Default Repository
This is the simplest method and ensures a stable installation, but the version may not be the latest.
To install Docker from Ubuntu’s built-in package manager, run:
|
sudo apt install -y docker.io |
This installs Docker along with its necessary components. However, if you need the most up-to-date features, consider installing Docker from the official repository instead.
Option 2: Install Docker from the Official Repository
If you want the latest version of Docker with ongoing updates, install it directly from Docker’s repository.
- Add Docker’s GPG Key – This ensures the authenticity of the package:
|
sudo mkdir -p /etc/apt/keyrings curl -fsSL https://download.docker.com/linux/ubuntu/gpg | sudo gpg --dearmor -o /etc/apt/keyrings/docker.gpg |
- Add Docker’s Repository – This allows Ubuntu to fetch the latest version:
|
echo "deb [arch=$(dpkg --print-architecture) signed-by=/etc/apt/keyrings/docker.gpg] https://download.docker.com/linux/ubuntu $(lsb_release -cs) stable" | sudo tee /etc/apt/sources.list.d/docker.list > /dev/null |
- Update the package index and install Docker – Now that Docker’s official repository has been added, we need to update the package index again so that Ubuntu recognizes the new source:
|
sudo apt update && sudo apt install -y docker-ce docker-ce-cli containerd.io |
Installing Docker from its official repository guarantees you’re running the latest and most secure version of Docker. Now that Docker is installed, let's verify that it's running correctly.
Step 3: Verify Docker Installation
After installation, it's important to confirm that Docker is running correctly. Run the following command to check the installed version of Docker:
|
docker --version |
This should return output similar to:
![]()
If you see a version number, Docker is installed successfully.
Next, verify that the Docker service is active and running. To do this run the following command:
|
sudo systemctl status docker |
If Docker is running correctly, you should see:
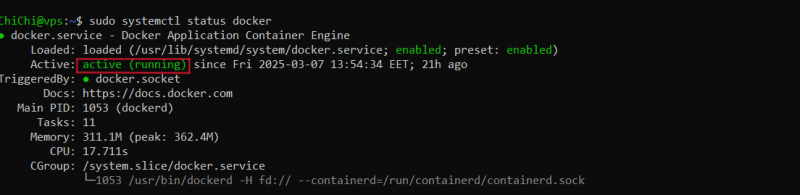
If the status shows "active (running)", Docker is installed and running.
Step 4: Add Your User to the Docker Group
By default, Docker requires administrative (root) privileges, meaning you must use sudo for every command. To make Docker more convenient, you can add your user to the Docker group, allowing you to run Docker commands without sudo.
Run the following command to add your user to the Docker group:
|
sudo usermod -aG docker $USER |
For the changes to take effect, you must log out and log back in. Alternatively, you can apply the changes immediately with:
|
newgrp docker |
After re-logging in, check whether your user is now part of the Docker group by running:
|
groups |
![]()
If you see docker listed among the groups, your user now has the necessary permissions. At this point, you should be able to run Docker commands without sudo.
To confirm, check the Docker version:
|
docker version |
If the setup is correct, you should get an output similar to this:
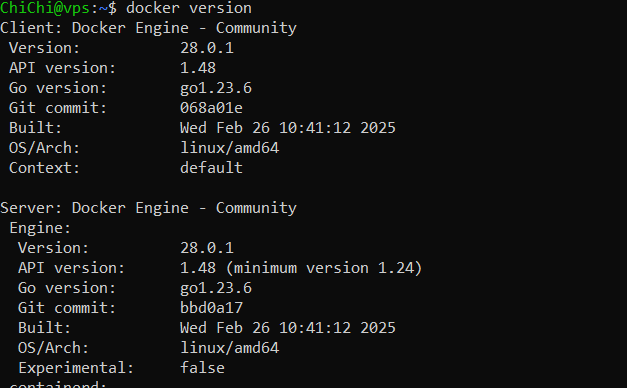
If the Docker version appears without any permission errors, your user has been successfully added to the Docker group.
Step 5: Run a Test Container
To confirm that Docker is working properly, run a test container using the hello-world image:
|
docker run hello-world |
If everything is set up correctly, you should get an output similar to this:

What happens in the background?
- Docker checks if the hello-world image exists locally.
- If not found, it downloads the image from Docker Hub.
- Docker runs the container and displays a confirmation message.
If you see the expected output, your Docker installation is complete.
Step 6: Enable Docker to Start on Boot
To ensure Docker starts automatically after a reboot, enable the service:
|
sudo systemctl enable docker |
This is essential if you plan to run containers that should persist across reboots.
Step 7: Basic Docker Commands
Once Docker is installed and running, it’s essential to understand the core commands used to work with Docker images and containers.
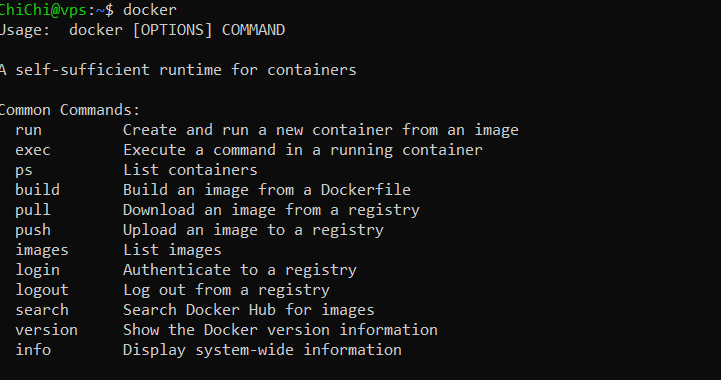
- Checking Available Docker Commands
Docker provides a built-in help system to explore available commands.
To list all available Docker commands, run:
|
docker |
To get detailed help on a specific command, use:
|
docker <command> --help |
For example, to learn more about the run command:
|
docker run --help |
This will display usage instructions and available options for the run command, helping you understand how to use it effectively.
- Working with Docker Images
Docker images act as blueprints for containers. They contain everything needed to run an application, including the operating system, dependencies, and application code.
- Search for an Image on Docker Hub
Docker Hub is the default registry where you can find official and community-built images.
To search for an image, run:
|
docker search nginx |
This command returns a list of images related to "nginx," along with their details. The output looks something like this:
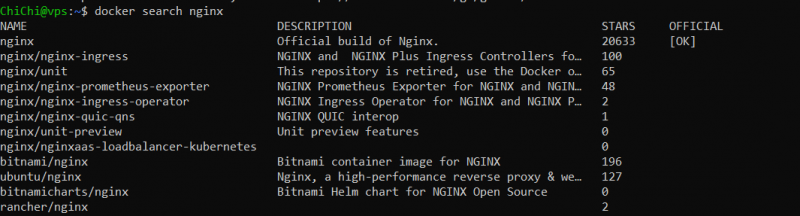
- NAME: The name of the image
- DESCRIPTION: A short description of what the image does
- STARS: A rating system showing popularity
- OFFICIAL: [OK] means this image is maintained by the official vendor (e.g., Nginx team)
- AUTOMATED: Indicates whether the image is built automatically from a source
If you're new to Docker, it's best to choose an official image, which is indicated by an [OK] in the 'Official' column. In this example, the only image marked [OK] is the one provided by Nginx.
- Download (Pull) an Image
Once you find the image you need, download it to your system using the docker pull command:
|
docker pull <image_name> |
For example, to download the official Nginx image, run:
|
docker pull nginx |

This means Docker has successfully connected to Docker Hub (Docker’s public repository for images), downloaded the requested image, and stored it locally on your system. Now, you can use this image to create and run containers without needing to download it again.
- List Downloaded Images
To view all images currently available on your system, run:
|
docker images |

The output displays the repository name, tag (version), image ID, creation date, and size.
3. Running and Managing Containers
A container is a running instance of an image. Once you have downloaded an image, you can create and run a container from it.
- Start a Container
To create and start a container from the nginx image while exposing it on port 8080, use the following command:
|
docker run -d -p 8080:80 nginx |

- -d → Runs the container in detached mode (in the background).
- -p 8080:80 → Maps port 8080 on your machine to port 80 inside the container (where Nginx serves web pages).
Once the command runs successfully, you can open a web browser and visit: http://localhost:8080
If everything is set up correctly, you should see the Nginx welcome page like the one below:

- Check Running Containers
To check which containers are currently running, use the following command:
|
docker ps |
![]()
- View All Containers (Including Stopped Ones)
If you want to see all containers, including those that have stopped, run:
|
docker ps -a |
![]()
From the output, there are two containers: the nginx container, which is currently running, and the hello-world container, which has exited. This makes it clear that nginx is still running, while hello-world has already stopped.
- Stop and Remove Containers
Once a container is no longer needed, you can stop and remove it to free up system resources.
- Stop a Running Container
To stop a running container, use:
|
docker stop <container_id> |
Replace <container_id> with the actual Container ID from docker ps.
For example, to stop the nginx container with ID 032fe3f24966, we’ll run:
|
docker stop 032fe3f24966 |
- Verify That the Container Has Stopped
To check currently running containers, use:
|
docker ps |
Since the container is now stopped, it won’t appear in the output. However, to see all containers, including stopped ones, run:
|
docker ps -a |
From your previous output, this should now display:
- Remove a Stopped Container
To delete a stopped container, use:
|
docker rm <container_id> |
For example, to remove the nginx container, we’ll run:
|
docker rm 032fe3f24966 |
To remove all stopped containers at once, run:
|
docker rm $(docker ps -aq) |
This will delete both the nginx and hello-world containers, ensuring they no longer take up space.
4. Removing Docker Images
If you no longer need a Docker image, you can delete it from your system. However, before removing an image, you must first delete any containers that are using it.
- Remove an Image
To remove an image, use:
|
docker rmi <image_name> |
For example, to remove the nginx image, run:
|
docker rmi nginx |
If the image is still being used by a container, you will see an error message similar to:
This means that at least one container (in this case, container a05d69559cf1) is still associated with the nginx image.
- Force-Remove an Image
To delete the image along with any dependent containers, use the -f flag:
|
docker rmi -f <image_name> |
For example, to force-remove nginx:
|
docker rmi -f nginx |
This will delete both the image and any containers using it, resolving the conflict.
Conclusion
By following this guide, you’ve successfully installed Docker on Ubuntu 24.04, verified the installation, and learned essential commands for managing images and containers. With Docker running, you can now streamline application deployment, create isolated environments, and manage containerized workloads efficiently.