

Wireshark is the world's leading network protocol analyzer, widely used for network troubleshooting, cybersecurity analysis, and protocol development. With support for over 2,500 protocols, it remains the industry standard for network traffic analysis and a trusted choice among professionals and researchers.
In this guide, we’ll walk you through installing Wireshark on Ubuntu 24.04, ensuring a clear, step-by-step approach that both beginners and experienced users can follow.
Looking for an Ubuntu VPS to run Wireshark? Bacloud has you covered. Our NVMe-powered VPS servers are available in multiple global locations, offering speed and reliability. This tutorial was created using Bacloud VPS servers.
Get Ubuntu VPS for Wireshark
Wireshark is an open-source network protocol analyzer that allows users to capture and analyze network traffic in real-time. It provides a detailed view of how data flows between devices, making it an essential tool for diagnosing network issues, monitoring performance, and identifying suspicious activity.
Wireshark is considered an essential tool for network professionals due to its ability to perform the following functions:
● Network troubleshooting – Identifying connection issues and diagnosing slow network performance.
● Cybersecurity analysis – Detecting suspicious traffic and potential security threats.
● Packet analysis – Understanding how different network protocols communicate.
● Performance monitoring – Analyzing bandwidth usage and identifying bottlenecks.
● Network forensics – Investigating past network activity and identifying potential attacks.
Now that we understand Wireshark’s role, let’s move on to installing it on Ubuntu 24.04.
Before proceeding with the installation, ensure your system meets the following requirements:
● Ubuntu 24.04 Installed – This guide is specifically for Ubuntu 24.04. Bacloud engineers created and tested this tutorial with a KVM VPS server.
● Sudo Privileges – Administrative (root) access is required to install packages.
● Updated System – Keeping your system up-to-date prevents compatibility issues.
● Desktop Environment – Wireshark requires a desktop environment to run. If you're using a headless VPS, the GUI won't work. In that case, you’ll need to install a desktop environment or use TShark, the command-line alternative (see the note later in this guide).
Before installing any software, it's a best practice to update your system’s package list. This ensures you're getting the latest versions of dependencies and prevents conflicts.
Run the following command in your terminal:
|
sudo apt update && sudo apt full-upgrade -y |
This updates the package list and upgrades any outdated packages on your system.
Wireshark can be installed using two primary methods:
1. Using the Advanced Package Tool (APT) – This installs Wireshark from Ubuntu’s default repositories, ensuring stability and compatibility.
2. Using a Personal Package Archive (PPA) – This installs the latest stable version maintained by Wireshark developers.
The APT method is the easiest and most stable way to install Wireshark, as it uses Ubuntu’s default repositories. To install, run the following command:
|
sudo apt install wireshark -y |
During installation, you'll see a configuration prompt similar to the one below asking whether non-root users should be allowed to capture network traffic.
This is because Wireshark itself doesn’t capture packets, instead, it uses a separate tool called Dumpcap, which needs special permissions to access network interfaces.
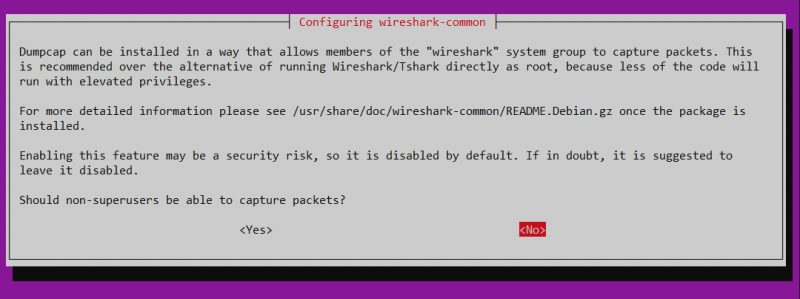
● If you select 'Yes,' non-root users will be able to capture packets, but you must manually grant them permission using the following command:
|
sudo usermod -aG wireshark $USER |
After running the command, restart your system or log out and back in for the changes to take effect.
● If you select 'No,' only the root user will have permission to capture packets. This means you must run Wireshark with sudo every time you use it:
|
sudo wireshark |
If you need a more up-to-date version with the latest features and improvements, you can install Wireshark from the official PPA maintained by its developers.
1. Add the PPA repository:
|
sudo add-apt-repository ppa:wireshark-dev/stable -y |
This command adds the latest Wireshark package source to your system.
2. Update package lists:
|
sudo apt update |
This ensures Ubuntu recognizes the newly added PPA source.
3. Install Wireshark:
|
sudo apt install wireshark -y |
As with the APT method, you’ll be asked whether to allow non-root users to capture packets. Choose "Yes" if you want to use Wireshark without root access.
Now that Wireshark is installed, let’s verify it and launch the application.
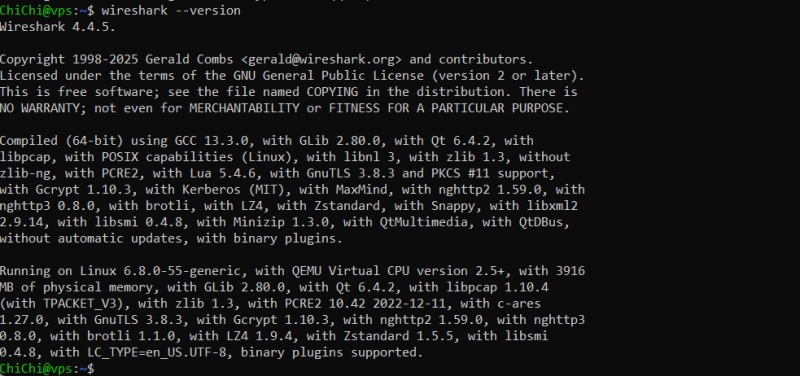
Before launching Wireshark, it's important to verify that the installation was successful. Run the following command to check the installed version:
|
wireshark --version |
If Wireshark is installed correctly, you should see an output similar to the one below displaying the installed version number. This confirms that Wireshark is ready to use.
Now that we've confirmed the installation, let's proceed to launching Wireshark.
Once Wireshark is installed, you can launch it either from the terminal or through the desktop interface, depending on your setup and preference.
The simplest way to launch Wireshark is by running the following command in the terminal:
|
wireshark |
This will open the Wireshark GUI, allowing you to start capturing and analyzing network traffic.
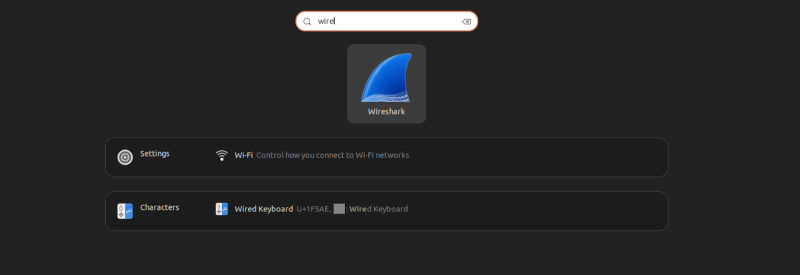
If you prefer a graphical approach, you can launch Wireshark from the desktop interface. Open the Activities menu (or Applications menu, depending on your Ubuntu setup), search for 'Wireshark,' and click the Wireshark icon to launch the application.
This method is ideal for users who are more comfortable using the graphical interface rather than using the command line.
Note: If you're running Ubuntu 24.04 on a headless VPS, the GUI version of Wireshark won’t work. Instead, use TShark, the command-line version of Wireshark:
|
tshark |
This allows you to capture and analyze packets directly in the terminal.
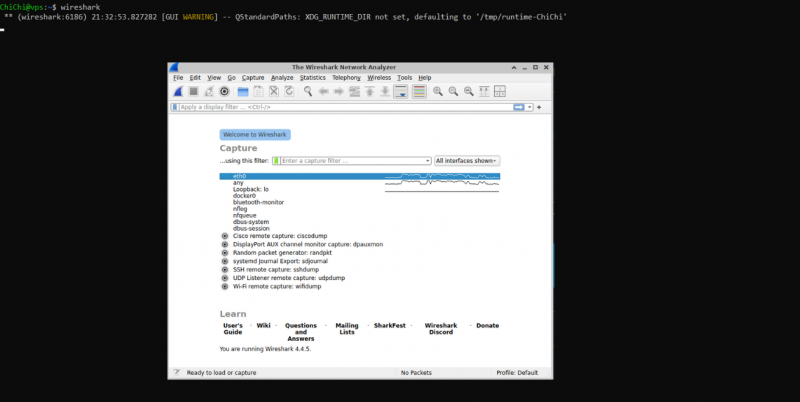
After launching Wireshark, the next step is to capture network traffic. Wireshark provides a user-friendly interface to monitor and analyze data packets in real time.
Before you start capturing packets, you need to select a network interface for monitoring, such as Wi-Fi, Ethernet, or a virtual adapter. On the main screen, you'll see a list of available interfaces, similar to the one below:
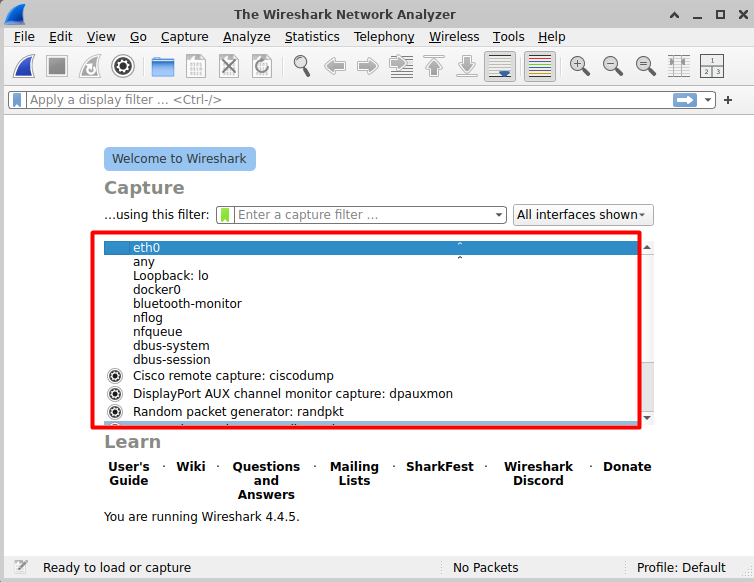
Click on the network interface you want to analyze. In the image above, eth0 is selected.
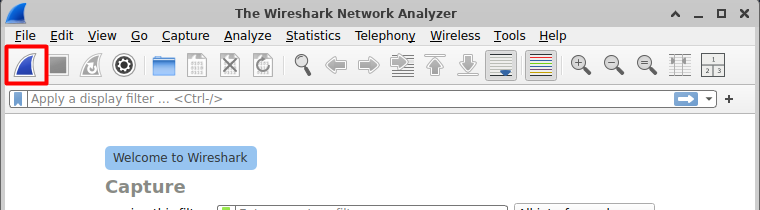
Click the Start button (a blue shark fin icon) to begin capturing live network traffic.
As soon as you start, Wireshark will display packets being transmitted and received on the selected interface.
The captured packets will appear in real time in a structured list like the one below:
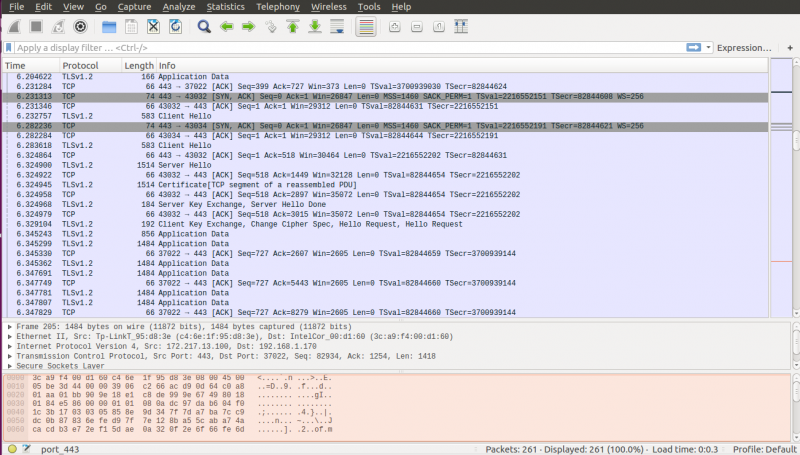
You can inspect packet details by clicking on any entry.
When you’ve gathered enough data, click the Stop button (a red square icon) or press Ctrl + E.

If you need to analyze the data later, go to File > Save As… Choose a location and save the capture as a .pcap file.
If you need to remove Wireshark from your system, follow the steps below based on your installation method:
If you installed Wireshark using APT, remove it along with its configuration files by running:
|
sudo apt remove --purge wireshark -y |
If you installed Wireshark using the Wireshark Developer PPA, start by removing the repository:
|
sudo add-apt-repository --remove ppa:wireshark-dev/stable -y |
Next, uninstall Wireshark using the following command:
|
sudo apt remove --purge wireshark -y |
After uninstalling Wireshark, it's good practice to clean up any leftover dependencies and update your package list:
|
sudo apt update sudo apt autoremove -y |
Wireshark is a powerful tool for analyzing network traffic, and installing it on Ubuntu 24.04 is straightforward using either APT or a dedicated PPA. By following these steps, you can capture, inspect, and troubleshoot network packets. If needed, removing Wireshark is just as simple. Now that it’s set up, you can start analyzing network activity with confidence.